No Post on Sundays: I fixed this PC once already... #473
Chapters9
The host notices the card won't turn on and starts with the basic checks and BIOS reset to rule out common post issues.
Adamant IT fixes a no-post PC by bench-testing, diagnosing a PCIe 12V short, and replacing a DR MOSFET to bring the system back to life.
Summary
Adamant IT’s latest repair video centers on a repeat offender PC that won’t power up. After confirming a BIOS reset and testing the CMOS battery (3.04V), the culprit appears to be a failed PCIe power rail rather than a simple POST issue. The host swaps in a different power supply (Game Max) and then benches the motherboard, CPU, and RAM outside the case to pinpoint the fault. A dead PCIe 12V line is traced to a blown high-side MOSFET in the graphics card’s VRM. Although the card’s memory and core stages look scorched, the host discovers the fault is isolated to one DR MOSFET in the power stage. He replaces the failed Alpha and Omega BLN0 part (AoZ5311NQI) with a fresh unit, reflows the pads, and tests the card on the bench before reinstalling everything. Boot and driver installation go smoothly, and the repaired system passes a burn-in test with the GPU running around 75°C and clocks in the high 1800s for the 3060 12GB. The project concludes with the repaired card reinstalled into a customer PC and the repaired unit observed in a display PC for ongoing monitoring. The host notes the repair’s success by watching for stability over a couple of days of Super Position stress testing.
Key Takeaways
- BIOS reset is a quick first check, but a non-post issue can persist even after a reset if the power path is damaged.
- CVV-style battery voltage check (3.04V) suggested but not the root cause; in desktops, you can tolerate slightly lower voltages more easily than in laptops.
- A no-POST symptom with a dead power button can indicate a PSU or PCIe power fault; swapping to another supply (Game Max) is a practical diagnostic step.
- Bench-testing the platform (motherboard, CPU, RAM) outside the case helped isolate the fault from the case and airflow variables.
- A PCIe 12V short to ground points to a failed VRM/ MOSFET; in this case the memory/core MOSFETs showed no obvious physical explosions, but one high-side MOSFET was shorted.
- The DR MOSFET package (dual MOSFET with integrated drivers) simplifies repair because replacing the MOSFET also replaces the driver in one component (AoZ5311NQI).
- The Alpha and Omega BLN0 series MOSFET with AoZ5311NQI was substituted, demonstrating a practical path to repair by sourcing a matching DR MOSFET from vendors like eBay.
Who Is This For?
Essential viewing for PC technicians and DIY hobbyists who want a hands-on walkthrough of diagnosing a no-power PC, tracing a PCIe power short, and performing a MOSFET swap on a GPU VRM.
Notable Quotes
""The PCI Express 12VT input is shorted to ground. This is probably a high-side short.""
—Identifies the critical fault in the PCIe power rail during bench testing.
""I’m going to lob that back in again... that’s reset the BIOS. Turned on the power supply. Let’s try it again.""
—Shows the initial BIOS reset attempt and its limited impact.
""This has had a minute or two to sit. I’m going to try and turn this on again. The power supply has probably reset itself and it’s going to turn on.""
—Describes waiting on PSU reset before retesting power-on.
""One of these guys is shorted. That guy’s dead.""
—Clearly identifies the defective high-side MOSFET after testing the VRM.
""It’s another Alpha and Omega BLNO. This one says 6R6F because it’s got a different date code on it... same model chip.""
—Explains the MOSFET replacement part and model details.
Questions This Video Answers
- How do you diagnose a no-post PC with a suspected PCIe power short?
- What is a DR MOSFET and why is it used in GPU VRMs?
- How do you replace a blown MOSFET on a GPU VRM and test for a successful repair?
- Why would a computer that previously had a working GPU fail again after reassembly?
- What are best practices for bench-testing a PC outside the case to isolate power issues?
PC repairBIOS resetPower supply troubleshootingPCIe power (12V) shortDR MOSFETAlpha and Omega BLN0AoZ5311NQIGPU VRM repairThermal testingSuper Position stress test
Full Transcript
Hello, interwebs. Welcome to Let's Fix Computers. Um, this is probably a no post on Sundays, I guess. The the show that about computers that don't post that may or may not be posted on a Sunday. Um, anyway, um, this computer doesn't turn on. And the sharpeyed amongst you might recognize it as a computer that recently appeared on the podcast um, as a as a as a not working one. It had a busted graphics card that got replaced. Um, and uh, unfortunately it it went back out and it's come back in like uh, two weeks later uh, just not turning on and I'm like, "Oh, awesome.
It's this one again." Um, so I've got it plugged in and when I push the power button, it's just stone dead. Nothing at all. Um, so I'm a bit perplexed on that. So, uh, let's roll the intro and we'll start having a look and figure out why this thing doesn't turn on. So, uh, yeah, I'll see you guys after the cut. Okay, so let's start with the obvious, which is a BIOS reset. And just always always open proceedings with a BIOS reset cuz you never know. Um, uh, a stud BIOS can prevent a computer from powering on.
um like nine times out of 10 that's going to be more of a like no post issue, but I have seen just um I have seen a BIOS reset um you know get a computer to actually switch on where it didn't before. So let's just check the battery voltage while we're here. 3.04. Uh it's not great. That's not that's not the problem, but that kind of wants a new one. Um I'm going to lob that back in for a moment just because that's not our issue. I'm inclined to replace that, but also because it's a desktop computer, I'm a little bit less fussy about that.
My usual policy is to replace anything that's below 3.1. Um, however, that mainly applies to like laptops and that kind of thing because on a laptop or a console or something, the battery is a pain in the ass to get to. So, you kind of want to replace it out of preventative maintenance. But on a desktop computer, it's so easy to get to it that you can let them run a little bit lower and just like it's fine, you know? So, yeah. Um, so we've popped that out. Put it back in again. That's reset the BIOS.
Turned on the power supply. Let's try it again. Still nothing. Cool. Okay. And a surprise to no one that wasn't it. Um, right. Well, let's go for the obvious first and try a different power supply. Um, this computer has an old Corsair CX550 in it. Um, this has this does have a bunch of reconditioned parts in it, including that power supply. So, it's possible that the power supply has just decided to go bang, which would make me kind of sad. Um, but you never know. So, we'll just unplug the power supply and uh I'll grab another power supply.
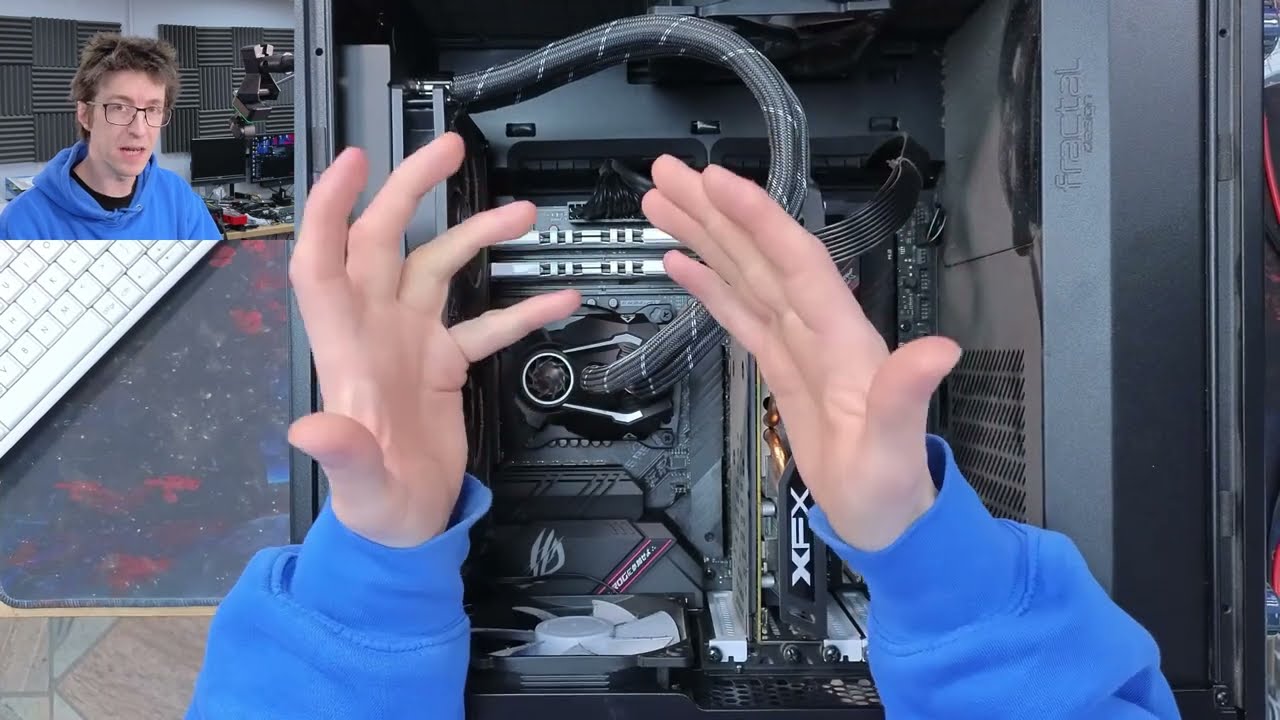
Game Max. Uh, and you go plug this guy into here and power. Okay, nothing happened, but I did see the power light come on for a moment that time. I don't know if it came out if it appeared on the camera or not. The camera might have caught it. I'll I'd point that out in the edit. I don't like that at all. That makes me think that there's a short or something. Uh, okay. Right. Uh, I'm going to start out by taking the motherboard, CPU, and RAM. I'm going to take the platform out of the case and just bench test that with another power supply just to see if this works.
And then we'll start working backwards toward the rest of the computer. Okay. So, first things first. Does this turn on? Yes, it does. Okay. Right. The platform's come back to life. I'll turn that off again. I'm going to go a step further now and plug this graphics card in. I'm going to be really upset if this computer has blown up a second graphics card. Damn it. My power buttons don't fit under this graphics card. I need to make a new one of these. This is a widget that I made up from just a um uh a header block and I've just soldered on some LEDs and some buttons.
So, I just plug that in and I've got power lights and reset and stuff like that. But, um, I kind of need this on something a bit more elegant just so it doesn't get in the way of everything. Anyway, right, let's short the power button. Oh, no. And if I unplug the graphics card completely and we go again. Okay, we're still dead. But I would wager if I turn the power supply off and on again. This has had uh this has had a minute or two to sit. I'm going to try and turn this on again.
The power supply has probably reset itself and it's going to turn on. God damn it. Right. I'm going to start with some basic stabbing on the PCI Express connector here. So, if we go along the top row of pins. So, there's the locking connector. That's the lock there. So, this is the top row. So, these guys should all be ground, unless I'm mistaken. Ground. Ground. That's the sense pen. Can't remember what that's supposed to read, but it's not ground. And then ground again. Yep. And then on the bottom row, we've got the other sense pin, sense B.
And then we should have 12. Uhoh. 12. Yeah. And 12, which are all reading zero ohms to ground. So yeah, the the uh the 12vt input, the PCI Express 12VT input is shorted to ground. Uh this is probably a high-side short. So the bad news is um that um something that the the main power rail has blown up on this. Um it's probably a high-side short. The good news is that there is a pretty decent chance that the graphics card survives this. Um, so this is certainly something we can look at. Let's open it up and take a look.
Now, full disclosure, I'm not an expert with graphics cards, but a main rail short is one of the most basic problems, which is why I'm entertaining the idea of having a look at it. So, let's see what we can do here. or at the very least just just see if we can diagnose it. As I take it apart, I'm going to be just looking for any signs of distress, which I'm not seeing at the moment. All right. That looks like that's been repasted at some point cuz that's a lot of goop. Oh my god. Come out.
There we go. All right. And moment of truth. We'll just peel back this bit here. Right. None of the power stages look like they've exploded. That one's reading zero. Okay. Interesting. It looks like these are isolated. Oh no, I'm an idiot. Um, okay. Four four of these are the core and two of them are memory. So if we go up here, one 2 3 and four are shorted. Then five and six are not shorted. So it's one of these guys. Uh the question is which one? Right. Let's have a look under the microscope. So those are those are the memory cores.
Then we've got four, three, two, one. And what's that? That doesn't look very nice. Yeah, there we go. That looks That looks bad. What's happened to you? I'd almost say that looks like it's been hand soldered at some point. I wonder if this thing has had work done on it before. It's hard to tell cuz I'm not an expert of looking at graphics cards, but yeah. You know, I might just touch up those joins and just see what happens. Let's try my luck. Be a miracle if it hasn't blown up that power stage, but we'll try.
I'll grab some isopropyl and just clean the area up. Right. Can I get in there with my current tip or do I need to go down to the small boy? That will get in there. Right. Let's just run the iron across that and just see if anything happens. Oh gosh. Flux. All right. That's extremely rough, but I just want to see if that magically clears up any shorts. I'm not holding my breath, but I've removed some solder blobs. So, no, that's still shorted. Yeah. in a surprise to no one. Okay. Do these match? Yeah, they do.
Right. I'm going to take off that power stage just to confirm that that's the one that's causing the problem. Who's holding on? Okay. And with that power stage removed, we are no longer shorted. So, this guy here is going to have a high-side short. So, if I turn that around roughly into the orientation it was in, we're going to find Let's go into diode mode and we should Okay, there we go. Yeah, that's all the way through. Yeah, that guy's just turbo shorted. So, yeah, this guy's dead. All right, I'm going to find out what I need to do about this.
Okay, it's a couple of days later and I've got a new MOSFET for this thing. So, uh, let me just quickly take this apart. I did a very rough reassembly just for storage. So, I'll open it back up again. Um, and while I'm taking it apart, we'll just quickly discuss what I'm changing. So, I've got just the MOSFET that blew up. Now, normally on a uh on a VRM circuit like this, when you have a high-side short, um it's not always a good idea to just blindly replace the MOSFET that exploded because normally that the MOSFET is often I mean it can be the cause of the failure, but it might not be the cause of the failure.
Um there might be a reason why the MOSFET failed and that can be because for example the driver failed. So the MOSFET is a digital switch um that you that has a small um a small voltage switch on a larger voltage um and that small voltage is comes from a driver chip and then the driver chip has a signal going to it telling it to turn on and off. So, basically, you have uh switches that turn on switches that turn on switches until you get down to something that your um your controller chip can actually output.
Um now, the problem is is that if the driver has failed, if you replace the MOSFET, the driver will just blow up another MOSFET. However, the MOSFETs on this card are called DR MOSFETs. And what that means is that the driver is integrated into the dual MOSFET package. Earlier on I referred to these as power stages, but that's not quite accurate. Power stage is a bit of a catch all term, but technically speaking, these are dual DR MOSFET. So, it's a dual MOSFET package with the driver built into it. And so, as such, we only have to replace the MOSFET and we'll get the driver as well.
Ah, there we go. So, now I've got the cover back off of this thing. So, let's bust out our new one and we'll just have a quick look at what this is. So, the MOSFETs we've got here are these um uh Alpha and Omega BLN0 MOSFETs. The 2P22 is the manufacturing date and lot code. So, that's just a manufacturing mark. So these are all 2P22 because they're from the same batch, but BLN0, that's the bit that matters. And if I bash that into Google, and that brings up the data sheet, which is this AoZ 5311 NQI.
So that's a DR MOS power module. So uh and if we take a closer look in there, you can see that it has two integrated MOSFETs and it has two integrated drivers for the high side and the low side. and all the logic uh all of the logic and stuff is built into it as well. And then this goes back to the PWM controller which generates our signal to switch things on and off. And uh then there's a there's some other communication as well. And depending on how fancy this can be, it could be just a simple package like this with two MOSFETs and the drivers or you could also have like current sense and temperature sense and stuff like that.
And that's when you get into the realm of smart power stages and that kind of thing. So, I then just hopped on eBay and searched for um and searched for AoZ53 um well, I searched for AoZ 5311 and it came up with a couple of matches that were all approximately the same model. So, as soon as I managed to get this packet open and there it is. So, it's another Alpha and Omega BLNO. Um this one says 6R6F because it's got a different date code on it because it was made at a different time, but it's the same model chip.
So, I've just got to solder this onto there, and that should get this thing working again. So, um, what I'm going to do, I'm going to just roll some fresh solder over those pads to make them ready. And that should make this nice and easy to put on. So, I'll turn my soldering iron back on, and we'll just put some leaded solder onto there and some flux. I want solder on the pads. I don't want to put too much solder on the center pad though, so I'm trying not to hit that. There we go. Some of these are uh joined together, so it doesn't matter if we get a little bit of uh solder blobbing there.
I do want a little bit on the center pad. There we go. That'll do. Okay, that should be enough. Let's put you down And now we're going to come in with the hot air again. Here we go. All right, that's doesn't seem to be moving around too much. So, let's just start flowing that in place. And when all those solder blobs go molten, we should see it just start floating on the solder blobs. Okay, there we go. I think we're about there. I'm going to give it a little bit of a nudge. Okay, that's not really dancing the way I wanted to, but I would say that's on.
I want it to move backwards a little bit. I think we're slightly off grid here. I'm not very good with these things. That's it. Back up just a little bit. Too far. Oh, clown fiesta. Oh, I suck. Okay, I've got the wrong tweezers for this. So, I'm just I'm overcorrecting. Okay, that'll do. All right, that wasn't my best performance putting a chip like that down, but it's on. So, let's just uh clean up the flux. Right, you can see on the side there that the soldering is still not quite there. There's not enough solder on those.
So, I'm going to put on my small tip and just run around those edges one more time. Cool. So, this thing should be ready for a test drive now. Just going to look at it and just make sure that nothing screamingly obvious is wrong. Doesn't look like I've knocked anything sideways, so I think we're good. So, let's stick the thermal pad back down on that. Put the cooler back on and take it for a test drive. Okay. Right. I'm going to go and test this. All right. This test computer has just booted up just fine.
Um I'll just make sure that we don't have any codes in device manager or anything. Uhoh. Reinstall the drivers for this device. Uh, okay. Fine. Oh, there comes the driver. Nice. This device is working properly. Great stuff. Cool. Okay. Well, in that case, what I'll do now is um I'll quickly take the car back to the bench and we'll just put the rest of the screws and the back plate on and then we'll give it a quick burn test to make sure that everything is okay. So, because I supplied this card to a customer, um in order to get their computer out faster, I just simply replaced the card in their computer with another 3060 12 gig that I had on hand.
So, this one now goes into one of my display PCs, which is good because it means I'll be able to keep an eye on it over the next uh week or two. Um, uh, on the assumption that computer doesn't immediately sell, but I'm not expecting it to. So, um, yeah, let's get this in, throw some burn tests at it, and see if it catches fire, which I hope it doesn't. Okay, so the card seems to be working just fine now. Um, it's had some time to heat soak and it's gotten up to about 75° which is what the card will be looking for and it seems to be holding fairly solid clock speeds in the high 1800s which is about right for a 3060 12 gig um or what I would expect to see at the very least.
Um, so time will tell if the card will hold up. Um, I'm going to leave it in this display PC and I'll probably leave um, Super Position running during the day while I'm around to keep an eye on it. And if it can get past a couple of days of running Super Position without immediately exploding, then it looks like that will have been a successful repair. But, um, yeah, certainly at face value, I think we're done with this one. So, thank you everyone for watching and I'll see you next time. Bye for now.
More from Adamant IT
Get daily recaps from
Adamant IT
AI-powered summaries delivered to your inbox. Save hours every week while staying fully informed.